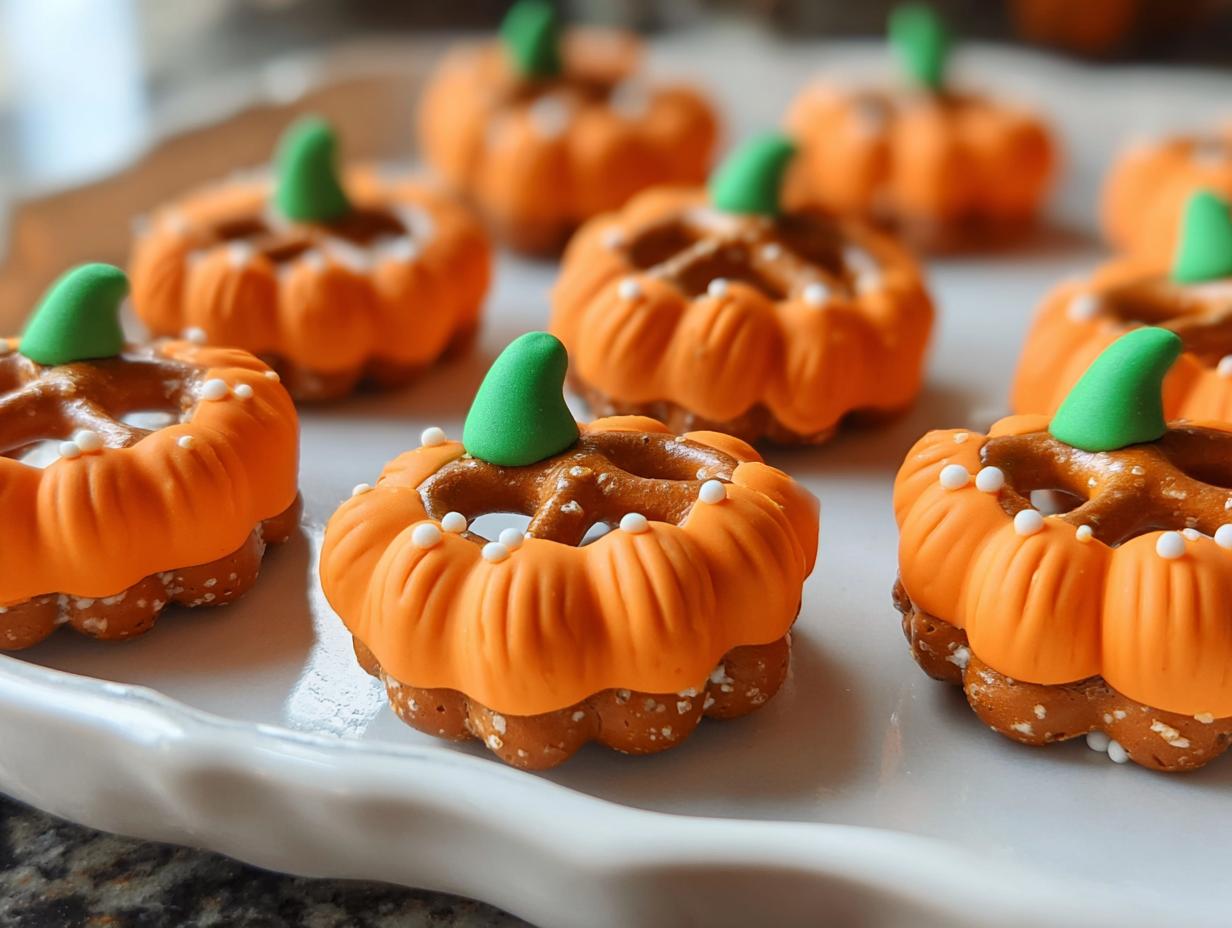
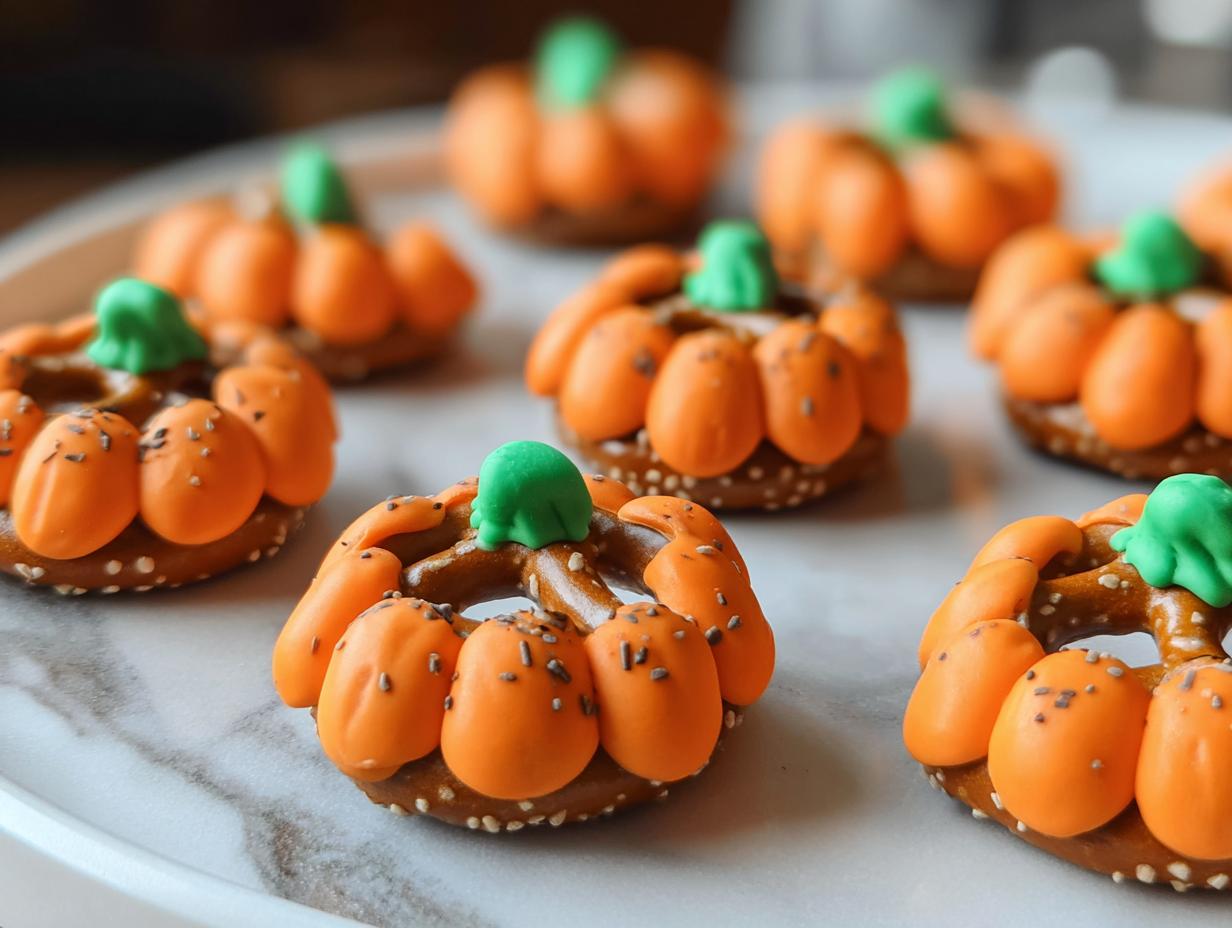
Mini pretzel pumpkins have become my absolute go-to for a quick and charming fall treat. I remember making these with my niece last year, and her squeals of delight as we transformed simple pretzels into tiny, edible pumpkins were the best! The sweet, salty crunch combined with the smooth candy coating is just irresistible, and the smell of the melting orange candy filling my kitchen always makes me feel so festive. If you’re wondering how to make pretzel pumpkins that are both adorable and delicious, you’ve come to the right place for these easy pretzel pumpkin snacks. Let’s get cooking!
Why You’ll Love This Mini Pretzel Pumpkins
- Incredible sweet and salty taste sensation.
- Super speedy prep time – ready in under an hour!
- A fun, colorful treat that’s surprisingly budget-friendly.
- Perfectly family-friendly; kids love helping with these no-bake pretzel pumpkins.
- A delightful addition to any fall party spread.
- These no-bake pretzel pumpkins require no special equipment.
- They’re a visually appealing way to celebrate the season.
- A guaranteed crowd-pleaser for all ages.
Ingredients for Mini Pretzel Pumpkins
Gathering the right pretzel pumpkin ingredients is key to making these adorable treats. You’ll only need a few simple items to get started. The foundation of our little pumpkins is a bag of mini pretzels. I find the classic twisted ones work best for holding the candy center. For that perfect pumpkin color and smooth coating, you’ll need a bag of orange candy wafers. These melt beautifully and set up nicely, giving us that classic pumpkin hue. To create the stems, grab a bag of green sour straws or sour belts; these add a pop of color and a fun chewy contrast.

How to Make Mini Pretzel Pumpkins
- Step 1: First things first, let’s get our workspace ready for these fun little treats. Line a baking sheet with parchment paper. This prevents any sticking and makes cleanup a breeze. Arrange your mini pretzels in a single layer on the parchment. I like to give them a little space so they don’t stick together as the candy melts.
- Step 2: Now, let’s melt those orange candy wafers. The best way to do this is using a double boiler method, or you can carefully melt them in the microwave in 30-second intervals, stirring in between, until they are wonderfully smooth and pourable. The smell of melting candy is always a good sign we’re on the right track with these pretzel pumpkin making steps!
- Step 3: Grab a small spoon, and carefully fill the center holes of each pretzel with the melted orange candy. You want to fill them just enough to cover the gaps, creating a solid orange center without letting the candy overflow onto the pretzel itself. This is where the pumpkin shape really starts to form.
- Step 4: Let the filled pretzels set at room temperature for about 30 minutes. If you’re eager to speed things up, pop the baking sheet into the refrigerator for 10-15 minutes. You’ll know they’re ready when the candy is firm to the touch.
- Step 5: Time to define those pumpkins! Spoon some of the melted orange candy into a piping bag fitted with a small round tip. If you don’t have a piping bag, a small zip-top bag with a tiny corner snipped off works perfectly fine.
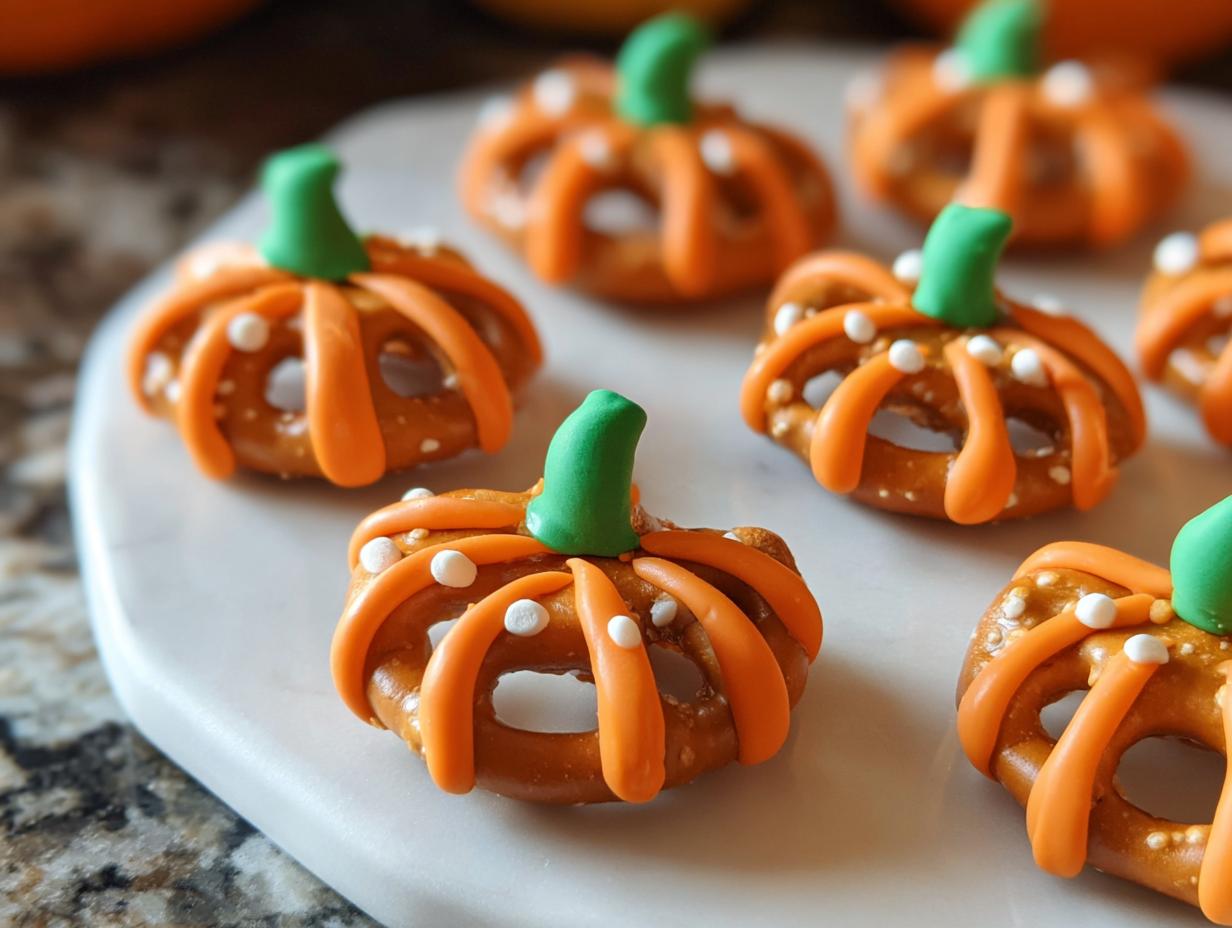
- Step 6: Pipe an outline around the orange-filled centers of the pretzels. This creates a nice border and makes the pumpkin shape stand out more.
- Step 7: To give our pumpkins that classic ridged look, pipe vertical lines from the top to the bottom of the filled centers. Don’t worry about perfection; a little variation makes them look even more charming.
- Step 8: For the stem, pipe a small dot of melted candy right where the top loops of the pretzel meet. This dot will act as the ‘glue’ for our stem.
- Step 9: Gently press a small piece of green sour candy into that dot of melted candy to create the perfect pumpkin stem. This is a fun part of the pretzel pumpkin making steps that kids especially love.
- Step 10: Allow the decorated mini pretzel pumpkins to cool completely until the candy is fully set. This usually takes another 15-20 minutes at room temperature.
- Step 11: Once everything is firm, carefully peel the finished mini pretzel pumpkins off the parchment paper. Admire your handiwork!
- Step 12: Store your adorable creations in an airtight container at room temperature until it’s time to serve them.
Pro Tips for the Best Mini Pretzel Pumpkins
Want to elevate your mini pretzel pumpkins from cute to absolutely perfect? I’ve got a few tricks up my sleeve from my own pretzel pumpkin crafting adventures!
- For the smoothest melting, don’t overheat your candy wafers. Melt them gently and stir often to prevent scorching, which can affect both taste and texture.
- When filling the pretzel holes, a small spoon or even a squeeze bottle works wonders for precision. This helps prevent messy drips and ensures each pumpkin center is nicely filled.
- Don’t rush the setting process! Letting the candy cool and harden completely is crucial for clean outlines and stems. Patience really pays off for these delightful fall pretzel pumpkin treats.
- If you find your candy is getting thick, you can reheat it gently for a few seconds to get it back to a smooth, pipeable consistency.
What’s the secret to perfect Mini Pretzel Pumpkins?
The real secret is using quality candy wafers that melt smoothly and setting them properly. Precision in filling and outlining is key for that professional look in your pretzel pumpkin crafting.
Can I make Mini Pretzel Pumpkins ahead of time?
Absolutely! These no-bake pretzel pumpkins are perfect for making ahead. Store them in an airtight container at room temperature for up to a week, making them ideal for party prep.
How do I avoid common mistakes with Mini Pretzel Pumpkins?
Avoid common pitfalls by not overheating your candy wafers, which can make them seize up. Also, ensure the candy filling is fully set before piping outlines and stems to prevent smudging.
Best Ways to Serve Mini Pretzel Pumpkins
These adorable mini pretzel pumpkins are so versatile! They make a charming addition to a dessert table, especially when arranged alongside other festive fall pretzel pumpkin treats like caramel apples or spiced cider cookies. For a fun party appetizer or a sweet snack, serve them on a platter with a side of cream cheese dip or even a light fruit salad to balance the sweetness. They’re also a fantastic edible decoration for cupcakes or a fall-themed cake, adding a playful, seasonal touch that everyone will love.

Nutrition Facts for Mini Pretzel Pumpkins
Here’s a look at the nutritional breakdown for each of these delightful mini pretzel pumpkins, perfect for understanding what you’re enjoying.
- Calories: 60
- Fat: 2.5g
- Saturated Fat: 1.5g
- Protein: 1g
- Carbohydrates: 10g
- Fiber: 0g
- Sugar: 5g
- Sodium: 70mg
Nutritional values are estimates and may vary based on specific ingredients used and the exact size of each pumpkin.
How to Store and Reheat Mini Pretzel Pumpkins
Once your adorable mini pretzel pumpkins are completely cool and the candy is set, it’s time to think about storing these delightful treats. For the best results, especially if you’re preparing them for a future event, make sure they are fully cooled before packing them away. This prevents any condensation inside your storage container. I like to use airtight containers, layering them between sheets of parchment paper to keep them from sticking. Stored this way, these no-bake pretzel pumpkins will stay fresh in the refrigerator for about 3-4 days. If you need to keep them longer, they freeze beautifully for up to 3 months! They’re perfect for making ahead as part of your pretzel pumpkin party food planning.
When you’re ready to enjoy them after refrigeration or freezing, there’s no real need to reheat them. Simply bring them to room temperature. If they’ve been in the fridge, it might take about 30 minutes, and if they were frozen, allow a couple of hours. This ensures the candy coating is perfectly firm and not soft from warming. Enjoy your charming fall pretzel pumpkin treats!
Frequently Asked Questions About Mini Pretzel Pumpkins
What are mini pretzel pumpkins?
Mini pretzel pumpkins are a delightful no-bake treat made by filling the centers of mini pretzels with melted orange candy wafers and decorating them with green candy stems. They’re a fun, edible craft that looks just like tiny pumpkins, perfect for fall and Halloween celebrations.
Can I use different colored candy melts for these?
Absolutely! While orange is classic for pumpkins, feel free to get creative. You could use brown candy melts for a chocolatey twist, or even black or green candy melts for spooky Halloween-themed pumpkins. Sprinkles in gold or even a touch of sparkle can add extra flair to your cute pretzel pumpkin ideas.
What are the best pretzel pumpkin making steps for kids?
Kids absolutely love helping with these! The easiest steps for them are filling the pretzel holes with the melted orange candy (with supervision, of course!), attaching the green candy stems, and adding any extra decorations like sprinkles. It’s a fantastic pretzel pumpkin craft for kids that’s both fun and rewarding.
Why make pretzel pumpkins for parties?
These treats are a huge hit at parties because they’re visually appealing, delicious, and easy to eat. They offer a perfect balance of sweet and salty, making them a unique snack. Plus, they’re incredibly budget-friendly and can be made in batches, making them ideal for feeding a crowd as part of your pretzel pumpkin party food spread.
Variations of Mini Pretzel Pumpkins You Can Try
Once you’ve mastered the basic mini pretzel pumpkins, you can totally get creative with these fun variations! These cute pretzel pumpkin ideas are perfect for customizing your treats. For a richer flavor, try using chocolate candy melts for the pumpkin centers, perhaps paired with a small piece of caramel for the stem. You could also experiment with different pretzel shapes, though the classic twists hold the candy best. For a healthier twist, consider using a naturally sweetened date-based filling or even a thick, reduced fruit puree, though these might require a bit more setting time. For more healthy snack ideas, check out these keto-friendly options.
- Chocolate Pretzel Pumpkins: Use brown candy melts for a chocolatey flavor, and maybe a little green sour candy for the stem.
- Spiced Pretzel Pumpkins: Add a pinch of cinnamon or pumpkin pie spice to the melted orange candy for a warm, cozy flavor.
- Gluten-Free Pretzel Pumpkins: Simply swap out the regular mini pretzels for your favorite gluten-free pretzel option!

Mini Pretzel Pumpkins: 10 Amazing Fall Snacks
- Total Time: 40 minutes
- Yield: 30 mini pretzel pumpkins 1x
- Diet: Vegetarian
Description
Create adorable and festive mini pretzel pumpkins with this easy, no-bake recipe. Perfect for fall gatherings, these sweet and salty treats are quick to make and a hit with everyone.
Ingredients
- 1 bag mini pretzels
- 1 bag orange candy wafers
- 1 bag green sour straws or sour belts
- Optional: additional candy melts for decoration
Instructions
- Line a baking sheet with parchment paper and arrange the mini pretzels in a single layer.
- Melt the orange candy wafers using a double boiler method until smooth.
- Use a small spoon to fill the center holes of each pretzel with the melted orange candy, ensuring it covers the gaps but doesn’t overflow.
- Let the filled pretzels set at room temperature for about 30 minutes, or refrigerate for 10-15 minutes to speed up the process.
- Spoon some of the melted orange candy into a piping bag fitted with a small round tip.
- Pipe an outline around the orange-filled centers of the pretzels to define the pumpkin shape.
- Add vertical lines from top to bottom on the filled centers to mimic pumpkin ridges.
- Pipe a small dot of melted candy where the top loops of the pretzel meet.
- Gently press a small piece of green sour candy into the dot of melted candy to create the pumpkin stem.
- Allow the decorated mini pretzel pumpkins to cool completely until the candy is set.
- Carefully peel the mini pretzel pumpkins off the parchment paper.
- Store in an airtight container at room temperature.
Notes
- Use black or green candy melts for Halloween-themed pumpkins.
- Add gold sprinkles for a festive Thanksgiving touch.
- Kids can help with filling pretzels, attaching stems, and decorating.
- Store in an airtight container at room temperature for up to 7 days.
- These treats are perfect for making ahead of time.
- Prep Time: 10 minutes
- Cook Time: 0 minutes
- Category: Dessert, Snack, Fall Treats
- Method: No-Bake
- Cuisine: American
Nutrition
- Serving Size: 1 pumpkin
- Calories: 60
- Sugar: 5g
- Sodium: 70mg
- Fat: 2.5g
- Saturated Fat: 1.5g
- Unsaturated Fat: 0.5g
- Trans Fat: 0g
- Carbohydrates: 10g
- Fiber: 0g
- Protein: 1g
- Cholesterol: 0mg

